Microphone test for online music lessons

Checks whether your computer, phone or browser is processing your microphone in ways that damage instrument sound: noise suppression, voice isolation, automatic gain control, noise gating and reduced bandwidth. The test runs in your browser. Nothing is uploaded.

What you need

Open the test sounds on your second device

Scan the QR code with your second device, or open this address on it:

Don't press Play yet.

Position the second device

  • Put it where your instrument usually is, about 0.5–1 m (2–3 ft) from the microphone.
  • Set its volume to about 60%. The sounds should be clearly audible but not loud.
  • Keep it in the same place and at the same volume if you repeat the test.

Record on this device

0:00

  1. Press Start recording and allow microphone access.
  2. Press Play on the second device. It says a short phrase, then plays tones, noise and claps for about 45 seconds.
  3. When the second device shows Finished, press Stop and analyse.

Recording stops automatically after 90 seconds.

How to turn off microphone processing

Processing can be applied at several levels. Check each level for your device, then run the test again.
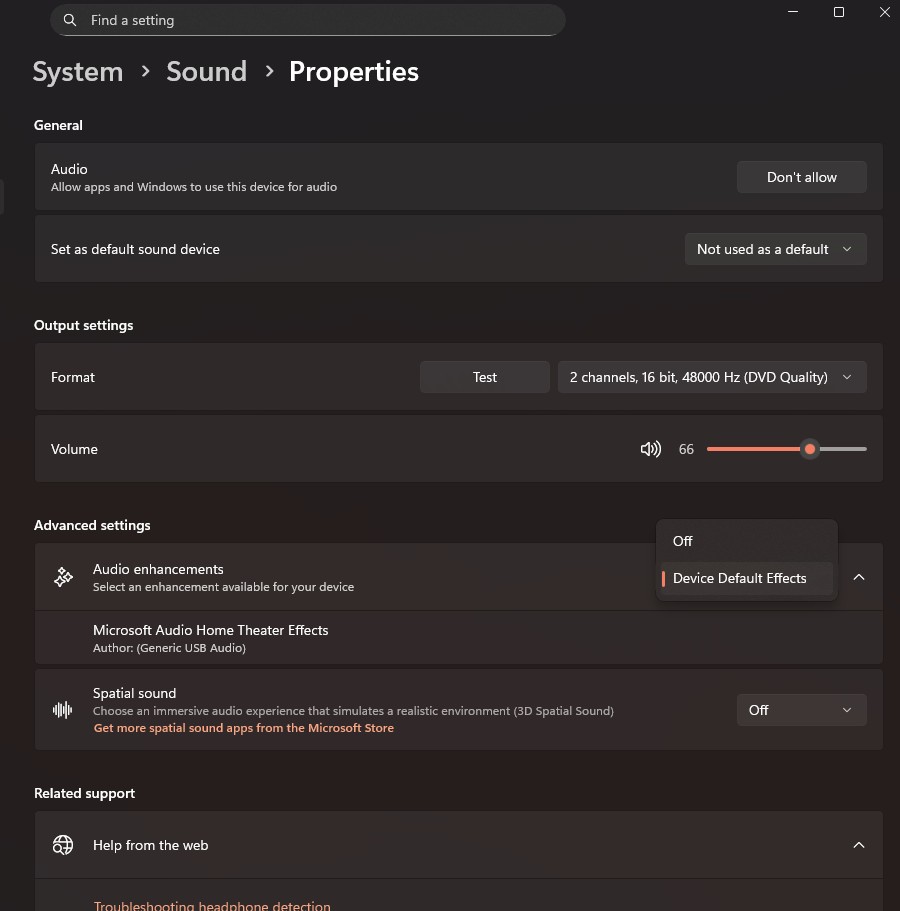
Windows
  1. Open Settings > System > Sound. Under Input, select your microphone.
  2. Set Audio enhancements to Off. If shown, also turn off Voice clarity, Voice focus or Background noise suppression.
  3. Do the same for your output device.
  4. Windows 10 or older: open Control Panel > Sound > Recording, select the microphone, click Properties. On the Enhancements or Advanced tab, tick Disable all enhancements.
  5. Check any audio app from your PC or headset maker (for example Realtek Audio Console, Dolby Access, Waves MaxxAudio, NVIDIA Broadcast, Krisp, Logitech G HUB) and turn off noise reduction, voice enhancement and automatic gain.
Windows sound settings showing the Audio enhancements option
Mac
  1. Open the browser or meeting app and start using the microphone (for example, start recording on this page).
  2. Click Control Center in the menu bar, then Mic Mode (if shown). Choose Standard, or Wide Spectrum if available. Don't use Voice Isolation. It removes most instrument sound.
  3. Open System Settings > Sound > Input, select your microphone and set the input level to about 75%. If shown, turn off Use ambient noise reduction.
  4. If you use an audio interface or USB microphone, turn off any auto-level, noise reduction or "voice" presets in its control software.

Mic Mode is saved separately for each app. Set it in your browser and again in your meeting app.
iPhone and iPad
  1. Open the browser or meeting app and start using the microphone (for example, start recording on this page or join the lesson).
  2. Open Control Center: swipe down from the top-right corner (on models with a Home button, swipe up from the bottom).
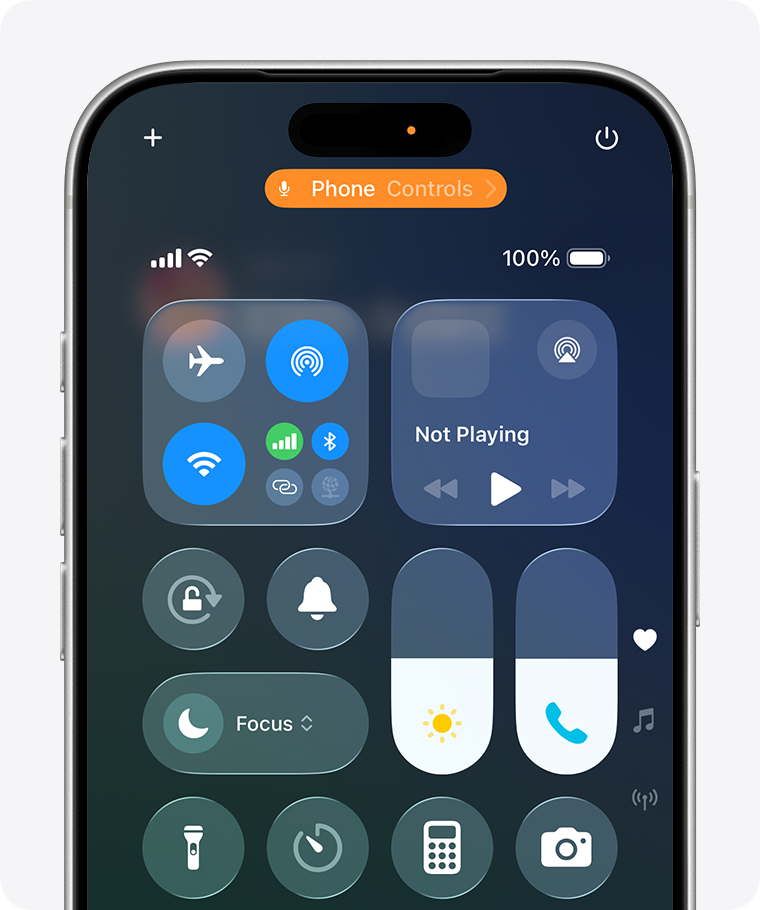
  3. Tap Mic Mode, or on newer iOS versions the [App] Controls button at the top. iPhone Control Center with the app controls button at the top
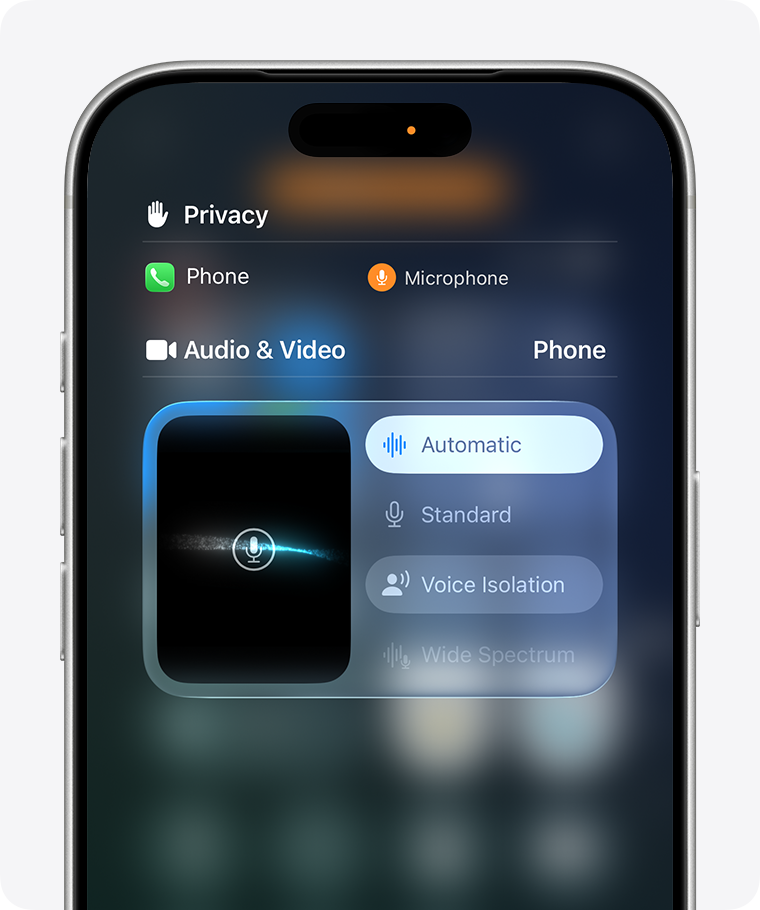
  4. Under Audio & Video, choose Wide Spectrum (best for music) or Standard. Don't use Voice Isolation or Automatic. iPhone Control Center audio controls showing Mic Mode options

Mic Mode is saved separately for each app. Set it in Safari (or your browser) for this test, and in your meeting app for lessons.

Android
  1. Samsung Galaxy: while the microphone is in use, swipe down to open the Quick panel, tap Mic mode and choose All sound (or Standard). Don't use Voice focus.
  2. Other devices: open Settings > Sound (or Sound & vibration) and look for Noise reduction, Noise cancellation, Voice focus or Mic mode. Turn it off. Names vary by manufacturer; searching Settings for "noise" usually finds it.
  3. Bluetooth earbuds and headsets use a low-quality call microphone. Use the phone's built-in microphone or a wired/USB microphone instead.
Chromebook
  1. Open Quick Settings (bottom-right), then the arrow next to the volume slider to see audio settings.
  2. Under Input, select your microphone and turn off Noise cancellation and any other voice effects shown.
Linux
  1. Check for noise-suppression filters in PipeWire or PulseAudio (for example EasyEffects, NoiseTorch, or an echo-cancel module) and bypass them for your microphone.
  2. Set the input level in your sound settings so the meter on this page stays below the red zone.
Meeting apps (Zoom, Teams, Google Meet)

Meeting apps apply their own processing on top of your device's. Turn it off in the app you use for lessons:

  • Zoom: Settings > Audio > Audio profile > Original sound for musicians. Tick High-fidelity music mode. In the meeting, make sure the top-left button reads Original sound for musicians: On. Only turn off echo cancellation if everyone uses headphones.
  • Microsoft Teams: Settings > Devices > turn on High fidelity music mode and set Noise suppression to Off.
  • Google Meet: Settings > Audio > turn off Noise cancellation.
  • Our online lesson room: open the audio settings (microphone icon) and turn on Original sound.
Web browsers

Browsers apply echo cancellation, noise suppression and automatic gain control by default. Web pages can request these off, as this test does. For browser-based lessons, the lesson app controls this setting (usually called "Original sound").

What the test checks

Noise suppression
Removes sounds the software treats as background noise. Held notes, bowed strings, organ and pads are steady sounds, so they fade out after a second or two. The test plays an 8-second note and a burst of noise and measures how much they fade.
Voice isolation / voice focus
Keeps speech and removes almost everything else, including instruments. Detected when the spoken phrase comes through clearly but music and noise are removed.
Automatic gain control (AGC)
Constantly adjusts the microphone level, which flattens dynamics (quiet playing gets louder and loud playing quieter) and makes the volume "pump" after loud notes. The test plays a series of notes, each 6 dB quieter than the last, and checks whether the differences are preserved.
Noise gate
Mutes the microphone below a threshold, cutting off quiet passages and the ends of notes. Detected when quiet steps disappear instead of fading, or when pauses are digitally silent.
Bandwidth
Voice processing and Bluetooth headset microphones often cut high frequencies, which makes instruments sound muffled. The test plays tones at 2, 4, 8 and 12 kHz.
Short notes and transients
Short notes and claps check that note attacks aren't being cut off.
Echo cancellation (not tested)
Echo cancellation only removes sound played by the same device, so a second device can't test it. It can make notes drop out while your teacher is playing. Wearing headphones avoids needing it.

Limitations